If you are thinking to start a blog on DreamHost hosting, then this guide is for you. Recently I have moved some of my sites on DreamHost and found it very interesting and a good host.

There are plenty of reasons as to why you should start a blog on DreamHost-
• It won’t take more than 5 minutes to start a blog with DreamHost
• It is reasonable – Total cost only $69
• You will get a free domain for a lifetime (not necessarily to choose at the time you buy hosting. You can select anytime)
• Their support team is quite helpful and quick
• It offers SSD hosting for Shared hosting without any extra cost
• You can host unlimited websites
This is a complete guide designed for the newbie who is just going to start a blog with DreamHost. I will show you from scratch and for this, I have bought one new domain as well.
For TricksRoad readers, I have one special flat discount of $50. Just buy from this link and get unlimited shared hosting just at $69 (inclusive of all costs).
They also provide 97 days money-back guarantee and so if in this 3 months of time, if you think you are not satisfied with their service, feel free to ask for a refund.

I think this is enough information to get you started and so far I am considering that you have bought the hosting and ready for WordPress installation on the Dreamhost server.
As I have already used the free domain provided by Dreamhost and so I will use one other domain which I bought recently from one BigRock sale.
Subscribe to our newsletter to get updated about the deals. This .com domain just cost me around $1.
How to Install WordPress on Dreamhost Hosting?
It’s time to start a blog on Dreamhost in just 5 minutes.
Step1: Login to your domain registrar (in my case it is BigRock), in case it is different from DreamHost (else jump to Step 4). Move towards your DNS management and add the below three name server under NS records and save it.
• ns1.dreamhost.com
• ns2.dreamhost.com
• ns2.dreamhost.com
Usually, it will get reflected soon but if not, then wait for a few minutes and your domain will be pointing to the Dreamhost server.
Step 2: Now login to your DreamHost account and Click on the Domain option.
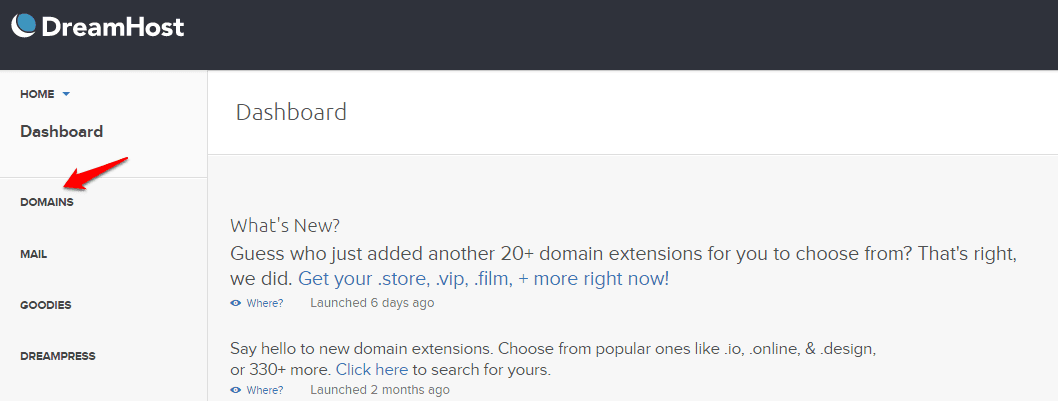 Here you will find a link called “Manage Domain”. Click on that and a new page will be available. The new page will be something like below-
Just click on the 1st tab, Add Hosting to a Domain/Sub-domain and you will be taken to a new page where you will have to enter the details of your new domain which you want to host on DreamHost.
Step 3: Here add the details of your new domain and at the end of this section, one button will be there called, “Fully Host This Domain”. Just click on it.

Once done, you will receive a success message like below. This indicates that your new domain has been added with Dreamhost successfully.

Now it’s time to install WordPress on Dreamhost hosting. Continue to follow the steps to start a blog on Dreamhost hosting.
Step 4: Just follow the three steps given in the below figure. Go to your dashboard, choose the goodies option. Inside that select One-click installs and a new page will appear. There you will have to select WordPress.

Step 5: A new popup will appear. There you will have to select the domain name on which you want to install WordPress and click on the button to install.
Leave the deluxe install option auto-checked as it will install the default plugins like Jetpack, Akismet, WP Super cache, etc.

Once done, it will show you the success message like below-

Now, just wait for a few minutes as it takes around 2-3 minutes to install WordPress. Once done, you will receive an email to create the user and start with WordPress. Hope you are getting my points and steps to install WordPress on DreamHost hosting. Just comment below if you are facing any issues.
Step 6: You will receive an email saying the details of the install and how to proceed further. Just click on the link that says, create a user. The link will be something like below-
http://www.domainname.com/wp-admin/install.php
Once you will click this, it will ask you to select the language. Choose your default language and move forward. You will find a screen like below. Here Provide the details like your site title, username (this will be username while logging into WP dashboard), password (will be your WP dashboard password), and admin email.
Once all done just click on Install WordPress. Don’t worry you can change these details later on as well.

Step 7: After installing it, you will be asked to log in to your dashboard. Use the same credentials you used in the last step and you will be redirected to your WordPress dashboard.

Done done done!!!
Yes, that was all the steps to install WordPress on Dreamhost hosting and start a blog on DreamHost in 5 minutes.
I am sure, all these steps won’t even take 5 minutes. So just follow this guide and start a blog on DreamHost hosting quickly.
Do try and share your comment with me. Also, let me know if you are facing any issues while installation.


Ashutosh Jha
Ashutosh Jha is a professional blogger, Blog and IT Consultant. He writes about Blogging, SEO, Making Money, Internet Marketing and Web Design.
If you liked the post, You can follow him on the below social media.
Website: TricksRoad
No Comment to " Start a Blog on DreamHost Hosting in 5 Minutes -A Step by Step Guide "
Please make your real thoughts/comments and don't spam. Spam comments will be removed immediately.